(Previous Topic: Setup Process)
Post/View Login Data
Typical on a restaurant business day, employees log in to start working and at the end of their shift, they log out. This may seem quite simplistic, but the hospitality industry is well known of having very complicated work schedules for their employees. Some employees work different jobs on the same day (i.e. waiter, bartender, chef) and for each job, could have different rate. For a medium sized restaurant, the log in data involve would be quite large.
And to be able to process their payroll, sometimes restaurant owners are forced to hire an additional employee dedicated to processing payroll. Otherwise, it would be eating up the precious time of their managers which could have been used on the floor where the action is.Log in data is already kept in the database files of Restaurant Manager Point of Sale (RMPOS) system and thus need not be entered manually in QuickBooks. It is at this point that the interface (POSQBi) becomes an excellent tool for saving valuable man-hours.
Summary of Steps in Posting Log In Data
To post log in data to QuickBooks, click on File > Open Login Data or use Ctrl-L keyboard command. The Sales Data window (see next section ) will be displayed. More detailed information for posting to QuickBooks is outlined in the following sections. For now, here are the few steps required to post login data.
-
Open the Log In Data window in POSQBi by clicking File > Open Log In Data or Ctrl-L.
-
In the From field, set the start date of the period.
-
In the Up To field, set the end date of the period.
-
Click on the Get Data button.
-
Check the Preview Data box.
-
Proceed to posting by clicking on Post To QB button.
Refer to the section on Warning and Error Messages if problems are encountered during the posting process.
Log In Data Window
One of the most popular capabilities of QuickBooks is to be able to process payroll with updated tax and labor laws kept up to date with its on-line and subscription service. To process it, QuickBooks needs the log-in information for each and every employee including how long they have worked a certain job and the associated pay rates.
The interface (POSQBi) provides this information by sending kept data from the Restaurant Manager database files to QuickBooks. When finished, QuickBooks can take over and do one of the things it does best, payroll processing and management.
The Log In Data window can be accessed in POSQBi by clicking on File > Open Log In Data or use the keyboard command Ctrl+L, the Log In Data window will be displayed.
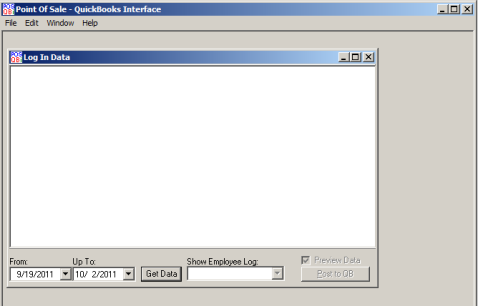
The Log In Data Window consists of the following fields:
- From: field- Use to set-up the starting date for the period of the data to be processed. Click on the down arrow to produce a pop up calendar. You may also enter the date manually in this data entry field..
- Up To:field- Use to set-up the ending date. Click on the down arrow to produce a pop up calendar. You may also enter the date manually in this data entry field..
- Get Data button- Click to retrieve the data for the specified period (entered in the "From" and "Up To" fields).
Note: The data that will be retrieved, although specified in previous steps are still going to be limited up to the last day of the payroll period. See the Restaurant Manager Manual about payroll period set-up.
- Show Employee Log- used to select and display specific employee log in data using the drop down menu..
- Preview Data checkbox- if checked displays a preview of the data before posting to QuickBooks (i.e. after selecting the
- Post to QB button- if the Preview Data checkbox is not checked, proceeds to posting the current log in data to QuickBooks.
Note- the Preview Data field and Post to QB button remain inactive until the Log In Data window is populated with data.
When the Get Data button is clicked, the Sales Data window will be updated to show the data broken down as an expandable tree view by session. If you click on the + sign on one of the nodes on the tree view, it will be expanded.
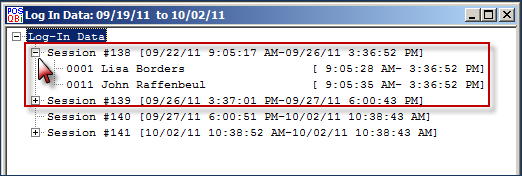
If an employee has multiple log in record for the same session, he/she may appear more than once in the list. Clicking on File->Print (or Ctrl-P) at this stage sends the over-all data to the printer. There is also a print function within the Data Preview window (appears only when Preview Data is enabled and the POS to QB button is used).
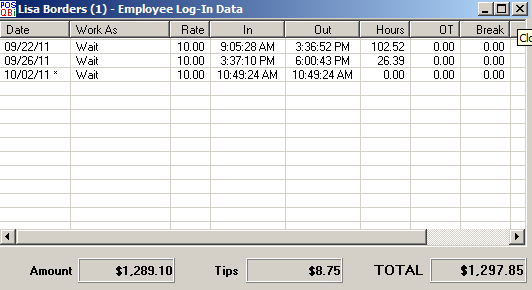
The Employee Log-In Data Window
For restaurants with a many employees or when data is to displayed and/or printed for a specific employee, drop down Show Employee Log: and select the specific employee.
This will bring up the window containing only the log in record for that specific employee as shown on the image on the right.
Using the keyboard command Ctrl-P to print, this time, will print this specific employee's log-in data.
Posting To QuickBooks
To post this data to QuickBooks, just click on the Post to QB button. If the Preview Data box is checked, the Data Preview window will be displayed showing the log-in of all the employees covered by the period as specified when the data were retrieved.
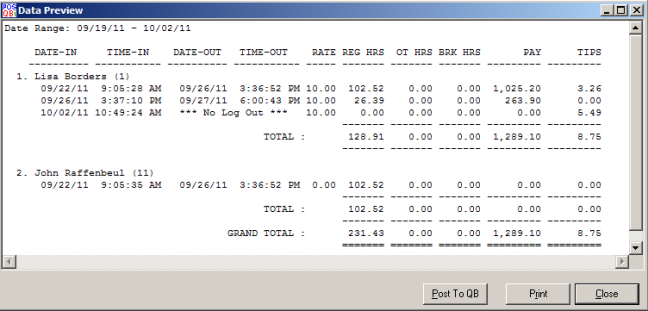
The contents of the Data Preview window (above) is similar to the print-out when you pressed Ctrl-P in the Log In Data window. At this point, when the Post To QB button is clicked, the displayed data will be sent to QuickBooks. However, if the Preview Data box is not checked, then it will skip the display of the Data Preview data window and will proceed to sending the data immediately. It is recommended that you review the data for accuracy before sending to QuickBooks.
QuickBooks Weekly Time Sheet
After the data has been submitted successfully, these can be reviewed in the QuickBooks application itself. To do this follow these steps:
- Click on Employees >Enter Time > Use Weekly Timesheet.

- Click on Set Date then enter the week end date. (in demo's use 06/02/90)
- On the name, drop down and select an employee on the list. (in demos use Ellen Alden or Lisa Borders).
- You should see an image similar to the one below.
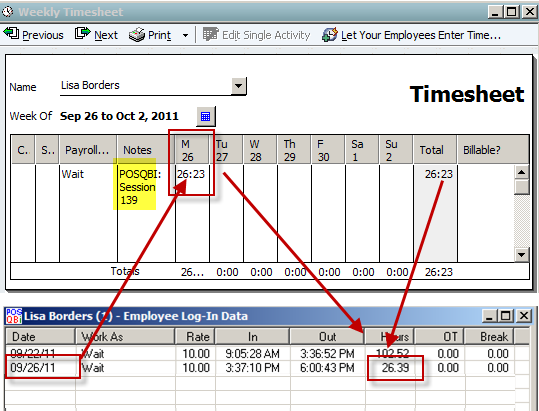
Notice the Notes column in the illustration above, you will see the hint text showing that says POSQBi: Session <nnn> or the session that the log record is taken from. This is to let the user know as to which session to look into if things need to be looked closely.